Getting the Wallet
To use the wallet you need to download from the Chrome Web Store here: Partisia Chrome Extension
Note: Please make sure you check before downloading that it is the official wallet. The best way to make sure is to check that the App Id is
gjkdbeaiifkpoencioahhcilildpjhgh
Initial Setup
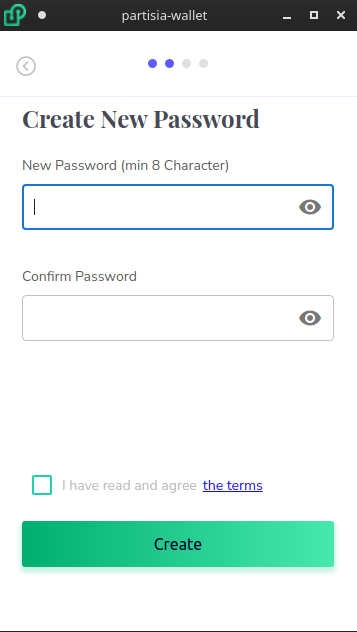
Before you are able to use your wallet, you must password protect it. Additionally this password will be required to be entered before anytime your private key is used.
To setup your password, follow the steps when you first load your wallet.
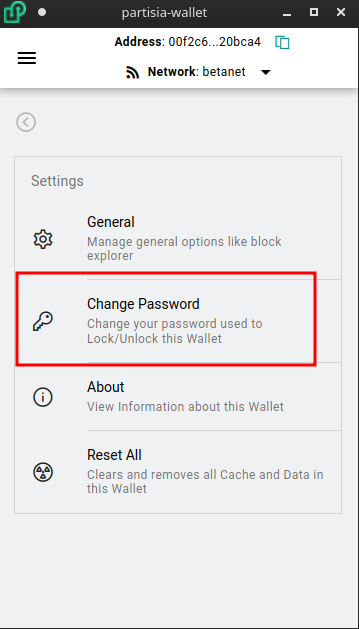
Reset Password
This password can be reset later on in settings -> Change Password:
Create New Wallet Address
There are five types of ways create a new partisia address:
- Mnemonic Phrase
- Private Key
- Twitter Authentication
- Ledger Hardware Wallet
- Backup Keystore File
Mnemonic Phrase
By default the mnemonic phrase will be 12 words, but this increases in setting->General up to (12, 15, 18, 21, 24)
Private Key
The private key should be a hexadecimal string with a length of 64
Twitter Authentication
You can obtain a Partisia Address through Twitter. This is done in cooperation with Torus Labs. Simply authenticate through twitter and the Wallet will automatically create your private key and address for you.
Ledger Hardware Wallet
Currently we are in the Ledger waitlist to be accepted as an official ledger-live app but until then you can still use a ledger hardware wallet if you are willing to set the device in developer mode and manually load the ADPU. Documentation can be found here: ledger-partisia-docs
Backup Keystore File
You can also generate and restore your wallet with an encrypted keystore file. To generate the keystore file select the Export to a Encrypted File option in Menu -> Backup
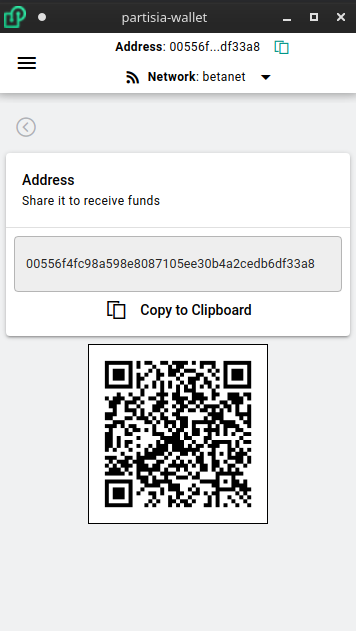
Receive funds
To view your address simply look at the header row of the wallet or click the receive button to show your full address and corresponding QR code
Wallet Backup
It is very important to always keep a safely secured backup of all your private keys. This will be the only way to recover your funds in the event anything happens to your computer.
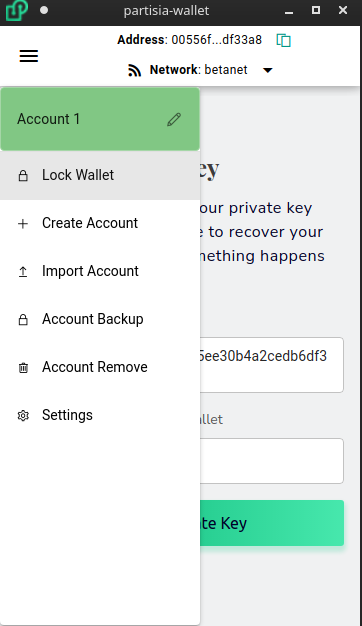
To take a backup, select the account you wish to backup and then from the menu select Account Backup
You will be prompted to input your password and afterwards your private key or mnemonic phrase will be shown. You also have the option to export your keys to an encrypted keystore file if you prefer not working with the keys directly.
Wallet Settings
Access Wallet Settings from the Menu
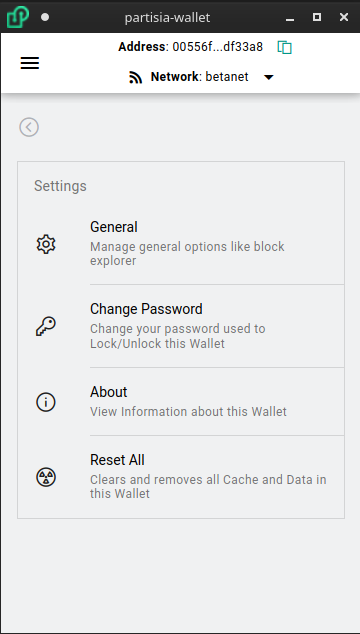
- General:
- Open as Popout Window: When clicking extension icon in toolbar opens a separate window instead of popup window. This is nice if you need to move back and forth between webpages and windows to input information
- Mnemonic Phrase: This is how many words in the Mnemonic Phrase. The more words the more entropy making brute force attacks more difficult. Choose between (12, 15, 18, 21, 24)
- Wallet Timeout: This is how long of inactivity before the Wallet automatically Locks and requiring a password to be entered
- Transaction Valid Time: Each transaction has an expiry time before the blockchain no considers the transaction valid. This is how long the expiration is. A longer time period gives you more time to review before sending but a shorter time period is helpful to prevent replay attacks.
- Block Explorer Account Url: This allows you to customize the base url for viewing on chain account addresses
- Block Explorer Transaction Url: This allows you to customize the base url for viewing on chain transactions
- Change Password: Reset your Wallet password
- About: Displays Wallet version and link to source code
- Reset All: Allows clear out all storage and cache in the wallet. It is critical to backup your wallet first before doing this, as that is the only way to recover your wallet later
Multiple Accounts
You can have multiple accounts at the same time in the wallet. From the menu button click either Create Account or Import Account
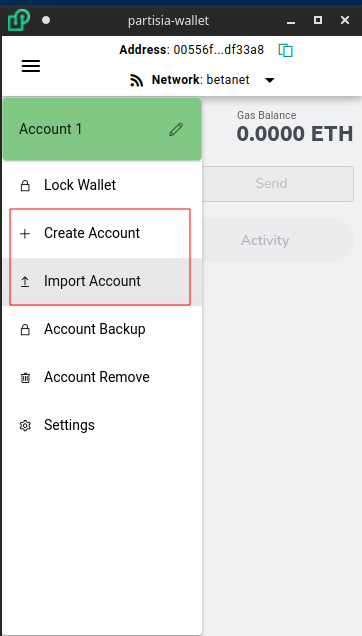
This will then allow you to Import or Create a new account.
- Note: if you want to use your Twitter as your wallet you will need to select
Import Account
Send Tokens
To send tokens, from the home screen click SEND or click the individual ERC-20 Token or NFT from the wallet list
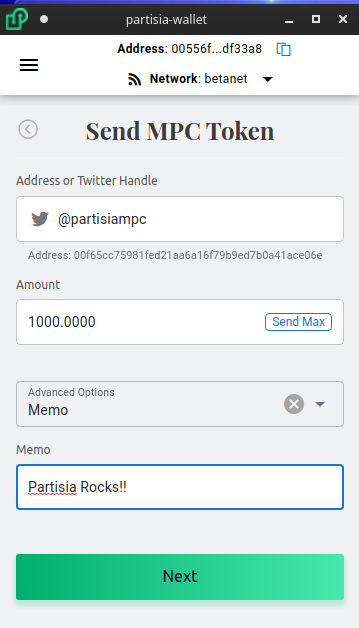
Filling in the Form
Address or Twitter Handle:
- User Addresses are 42 long hex staring with
00 - System Contract Addresses are 42 long hex staring with
01 - Public Contract Addresses are 42 long hex staring with
02 - Zero Knowledge Contract Addresses are 42 long hex staring with
03 - Twitter Handle must start with
@and are Case Insensitive
Amount
This is the amount of Tokens you would like to send.
Optional Memo/Number
The MPC token will allow you to include a Memo string or a Number Tag. This is particularly important for exchanges to make sure you send your transactions correctly.
Confirm Screen
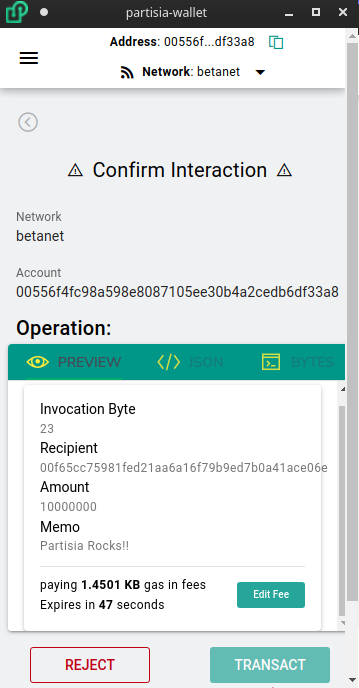
Before any transaction you will get prompted a review screen like the above. It is important to carefully review the information in this screen to make sure you are sending the transaction you intend.
Some important things to consider:
- Make sure the
Networkis correct - Make sure the receiving
Accountis correct - Make sure the details of the Operation are correct.
Please note that if you are sending a token that the numbers are shown without decimals
Edit Fee
You can edit the fee you pay for the transaction and increase or decrease depending on preference
Add more time
If your time expires you can click Add more time to reset the clock. There is no harm in doing this